Showing posts with label hand painted. Show all posts

Saturday, 11 January 2014

Langerhans Cells Inspired Nail Art: Nail Art Ideas Link Up January Challenge: Health and Wellness

I have always wanted to participate in a nail art challenge but they have always seem so impossible to me with 2-3 different designs per week!! Jacqui at Crafty nail recently let me know about the "Nail Art Ideas Linkup" that she organises each month with Brijit from Brijit’s Digits and Jemma from Eeeek! Nail Polish!  . These challenges are very chilled with just four designs per month, and no pressure to complete them all- Perfect!!! They are also very creative ideas, a bit different from the common themes you see in nail art challenges such as blue, dots, marble, etc :)


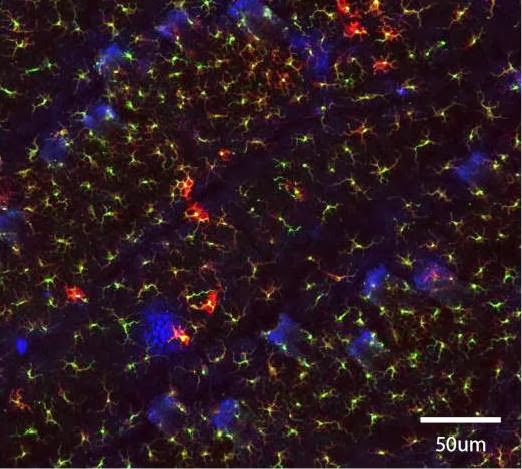
This month the first theme is health and wellness. Being a PhD student involved in medical research I immediately wanted to try some histology inspired nails. In my honours year I was lucky enough to do a lot of fluorescent immunohistochemistry which I imaged on a confocal microscope which is able to image very thin slices of an image and even build 3D images of whatever specimen your working with! The cells I studied were Langerhans cells which are dendritic cells which reside in the epidermis of the skin and have long arms that search for antigens and are the first step in triggering an adaptive immune response. Anyway...enough of that- all you need to know is that they are very beautiful! Here is some close up images (A=unactivated, B= activated). Sorry about the grainy image- its straight from my thesis!! The red and yellow cells are the Langerhans cells and the blue cells are the nuceli of the keratinocytes or skin cells :)


 And here is a less zoomed image- aren't they pretty??? (Yup I'm pretty proud of these pictures haha)


Ok and now for my attempt to recreate them on my nails :)


 I painted my nails first with OPI Black Onyx, and then with a polish I made to look like the blue 'hoescht' stained keratinocytes which has blue circular glitters and some holographic small glitters just for fun ;)

I then used white acrylic paint to paint the cells so they would stand out over the black. I made sure the cells arms weaved between the keratinocytes. I used China Glaze Sun-Kissed and China Glaze Shell-o to colour the cells.


I think I managed some likeness to the real thing but the arms needed to be finer. What do you think? Thanks for stopping by, and if you are interested in the nail art ideas link up (NAIL) follow this link.

Thursday, 9 January 2014

Simple Handpainted Tribal? Design

As I promised in my last post, I have finally stepped away from my stamping supplies and hand painted my nails!

I decided I wanted to paint a pattern on my nails with grey, black and a fluoro polish and found this simple pattern from http://ingredingrid.com/


 I started off by painting the pattern down the centre of my nails. Unfortunately I couldn't fit many repeats on!


 I really liked my nails like that and wore them for a day before adding more of the patten to the sides :)


 I had a lot of trouble photographing the fluoro polish- if anyone has any tips I would be forever grateful!!!!


The Polishes I used were:
Fluoro yellow: China Glaze Sun-Kissed  (This is slightly shimmery and very opaque)
Grey metallic: China Glaze Awaken
White base: OPI alpine snow
and the black is acrylic paint :)


 So what do you think of this simple pattern?
I like it- It was easy to do and looks sort of tribal :)


Thanks for stopping by my blog
xx

Wednesday, 11 December 2013

Christmas 2013 Nail Art Ideas: Simple and Not So Simple!

I must be the only nail art blogger whom has made it to half way through December without posting Christmas nail art. There is a reason for that.... I have been saving up all my Christmas manis for a big Christmas Nail Art extravaganza! 


First up I have a stamping manicure done with a Mo You London plate: Suki 07. I didn't buy any Christmas stamping plates (which I'm now regretting) but I think this design is quite Christmasy in the right colours. To centre the design on the red nails I actually made stamping decals using this tutorial and placed them in the exact centre of my nails. The red metalic polish is Revitanail "Ruby Rich", the white on my ring finger is OPI alpine snow and the white use for stamping is the white konad stamping polish.


 I really really enjoyed wearing this mani :) If you also like it please vote for me in the MoYou competition by liking and repinning this image on their board here.
I hate asking for votes, but some of the big nail art blogs have done the same and seeing as they have thousands of followers are smashing it!


 The next is the most simple Christmas nails I have to show you. Just a plain white with golden accent nail. The white polish is Essie Marshmellow which is much like OPI Funny Bunny, another favourite of mine. This is a white jelly which becomes opaque in just 2 coats (maybe 3 on some nails). I find this is a much easier polish to apply than the creme white polishes such as OPI Alpine snow and looks really clean. The gold polish is one that I created myself. It made up of small gold and larger square gold glitters and also white square glitters which are much more apparent in real life!
 

 I went further with this mani and free handed a Christmas tree on on middle finger, stripes on the ring finger and dots on the pointer finger (with hand placed gold glitter too). The star on the Christmas tree is a rhinestone purchased from ebay. 
My favorite nail is the pointer finger with the dots! 

The red polish used is Sally Hansen Lacquer Shine (red....I don't have the label) and the green is Essie Going Incognito (pointer, middle, ring). On the pinky I used a metallic green polish: Sally Hansen Emerald City from the Xtreme wear range. The red hearts are also a glitter.


 I did the same Christmas tree on this manicure as I had accidentally created recently on another triangle mix and match nail art design. I prefer the original actually- what about you?


 Next up is some simple snowflake nail art. 
Snowflakes tend to look very complicated but really all they are is a few lines (ie do a cross and then 2 more lines to create an 8 sided star. The add 1 or 2 small dashes to the lines. You can put a dot in the centre of the snowflake with your background polish to mix it up). I used acrylic paint to paint the snowflakes and the blue polish is one I made myself, which I'm calling Midnight Snow. I absolutely love it!!


Next is another nail stamping design created with MoYou London plates- this one Pro Plate 01. I stamped in red with the Sally hansen metallic red which I have no name for (sorry!!!!) and then painted the green lines in Sally Hansen Emerald city. I did this over a base coat of Essie Marshmellow. Again I did this with the stamping decal technique although after I realized that I could have probably done it straight onto the nail.I have also entered this on in the MoYou competition. To vote please like and repin the image here. Thanks!!! xx


The next is a very subtle look inspired by Christmas sweaters ...although nobody here in Australia would ever be wearing a sweater at Christmas time- its often 40 degrees Celsius at this time of the year (over 100 f) !!!
I painted my nails with a nude polish- Essie Jazz which looks absolutely awful with my skin tone apparently!!! My fingers look grey haha. The design was handpainted with a gold polish- Essie Good as Gold. The ring finger is the same gold polish made by yours truly as previously :)

 I think I like the thumb the best!


Update* And here is another Christmas nail design. See the whole post here :)


This last one is not strictly Christmas Nail art.....but I think anything in red and white adds a bit of Christmassy cheer to your nails! The full post with allll the details can be found here :)


Thanks so much for visiting. Merry Christmas!!


Wednesday, 27 November 2013

Triangle Mix and Match Nail Art


Today I have some nail art to share with you that I'm very very happy with!

I've wanted to do something with triangles for a long time, inspired by various favorite nail artists of mine such as Lindsay at Wondrously Polished and Camille at Pshiiit. So I painted my nails with my new Essie Midnight Cami, a metallic black/blue and got to work! 


 When I am trying a new design I often default to favourite colours because I know that if the design doesn't work out- at least I'll enjoy the colours. That's what I did here, using a metallic teal (Sally hansen Xtreme wear in 'The Real Teal') and copper (Essie Penny Talk) for the design. I kind of just winged it and did random triangular designs in the teal and lined everything in the copper. I then did some dots and swirls to take up blank space.

Here is a close up of the thumb- I'm kind of thinking it's the perfect abstract Christmas tree! What do you recon? Should I redo this design on all the nails for Christmas this year?


 Here is the other hand- I did similar, but slightly different designs.....mostly because I screwed up making them the same and decided to run with it!


 Yup lots of pictures.....I like them a lot.


 =D


So what do you think of my triangle mix and match nails?

Thanks for stopping by!!!

Chanfie

xxx

Monday, 11 November 2013

Remembrance Day Poppies


Today as a tribute to those who have fought and lost their lives in war I have painted red poppies on my nails.  
Red poppies were among the first to flower in the devastated battlefields of northern France and Belgium in the First World War. The vivid red of the poppy also signifies the blood spilled from fallen soldiers.

In England in 1919, the British Legion sought an emblem that would honour the dead and help the living. The Red Poppy was adopted as that emblem and since then has been accepted as the Emblem of Remembrance (ref).


 For these nails I first painted my nails with China Glaze Re-fresh Mint. I really like the colour of this polish, but I found it really gluggy and thick. I had to add nail polish thinner to the bottle every few nails.


I then used acrylic paint and some fine brushes to paint the poppies. 


It took me about 3 hours to do. I actually considered giving up and not doing my right hand. 
I'm glad I finished them though :) I really like them, and will probably keep them on until they chip.

Have you ever given up and not painted your non dominant hand?


Thanks for visiting :)

Friday, 8 November 2013

Grey and Coral Gradient Leopard Nails


A few weeks ago a  friend of mine had an African themed party as she had just gotten back from Safari. I wasn't very imaginative, and decide to go as a leopard.... maybe because I had been wanting an excuse to do leopard nails. I was inspired by Melissa over at Punch nails to go with some brighter colours than a real leopard :) 

On a side note the leopard photo above was taken by my Fiance last year when we went on Safari in Botswana with his family. On our first day at Chobe national park we found her alone glaring at a hyena who had stolen an impala she had killed.  The next day we tracked her down again and found not only her, but her two cubs and a male leopard who had dragged the kill up a tree to keep it safe from other scavengers. During the night she must have found him to win back the kill, and then fetched her cubs to feed them :)
So yes... not nail art related, but one of the most amazing things I've ever seen.


I chose to do a grey background (Misa, spaced out) with coral coloured spots.  To create a gradient of corals I used a white polish (OPI alpine snow) a fluro coral (China Glaze Flip Flop Fantasy) and a darker coral (Misa bop till you drop). I mixed them together to create about 5 different shades, and painted them as misshaped ovals and circles. I then used black acrylic paint to do the lines around them and complete the leopard print. If you don't have 3 different nail polish shades you could easily use just 1 colour with white to create different shades of the gradient.


If anyone is interested in dressing as a cheetah for Halloween (yes a whole year away now) or some other dress up party I also did leopard makeup which I was rather fond of.

I think this is the first photo I've put of me on my blog! I must be feeling more comfortable :P


Thanks for visiting :)

(And Cheers!)

Saturday, 2 November 2013

Yellow and Black Aztec Design


Today I have some very simple, but eye catching nails to share with you. I have been planning to try this yellow and black colour combo for a ridiculously long time. 
I'm so glad I finally got around to it, because I'm loving these nails!


I used OPI Black Onyx on the non feature nails, and China Glaze Happy go Lucky as my yellow (Great polish by the way- both colour and formula!).

For the feature nail I stamped an aztec design from the A53 plate with konad special polish. This only covered about half of the nail so I then used acrylic paint to fill in the rest. 
Can you guess which part is hand painted? ;)


I felt like the plain black nails needed something and I luckily had the perfect thing! 


I ordered a bunch of nail art wheels from ebay recently and one of them had these super awesome square and round studs in red, white, yellow, pink, green and purple with a black splatter effect on them. 
I found mine as an option out of 22 different rhinestone wheels. I haven't been able to find a name for these particular studs so you may need to scroll through different auctions =( 
However, the link above should go to search for the multi style nail art decoration wheels where I found mine. 


Thanks for reading and visiting :)
xx

Monday, 21 October 2013

China Porcelain Nails :)

So you may (or may not have) noticed an increase in the number and hopefully quality of my hand painted nail art recently. Lindsay from Wondrously Polished kindly gave me some advice on good brushes to use for nail art. I had previously been using just the cheap brushes available on ebay, which were ok for when your starting out, but aren't quite as fine as you can get. She suggested a brand called La Corneille which make liner brushes in sizes as low as 18/0 and 10/0. I haven't the foggiest what the sizes mean (perhaps it's 1/18th of an inch?... oops that was an oxymoron) but the 18/0 seems to be the smallest brush size I've been able to find anywhere. Anyway I ordered some from an American website (here) as the brand seems to be available only from American websites. The brushes were cheap (About $3-4 USD each) but I got hit bad on the shipping which was $21.00USD.  I have since found other brush brands that make brushes that small, so if I need more I'll get them from Australia for a bit cheaper.

Anyway, I have another hand painted design to share with you that I'm very happy with :)


As usual I had only a vague idea of what I wanted to do- something blue and white like China Porcelain. I contemplaited trying to paint dragons on my nails and gave up on that idea and decided on a floral. I actually used a stamp first (I took some pictures, but they weren't that great so I decided not to post them). I then decided to try recreate some Helen Dardik style flowers, which I guess aren't very Chinese, but they look cute in my opinion. Here is her blog....if you are ever feeling uninspired in the nail art department have a browse ;)

I feel like I should also say I first found Helen Dardik's website and art through a nail art blogger Try My hand who did a bunch of really amazing nail art based on Helen's work.


 The polishes I used were:
OPI Alpine snow (as the feature nail and also a base under the blue)
and Essie Bouncer It's me! for the blue nails and to paint the flowers.

I feel I need to write a small spiel on the Essie polish..

First of all it is the most amazing, vibrant, neon, blue polish I own (and I have quite a few).
However, as I said I had to layer it over the white polish to make it 'pop' and I needed about 4 coats to cover the white. So I did all this and when I woke up in the morning the top layer had shrunk leaving a rim of white around the blue at the edges of my nails..... meaning I had to remove all the white with a brush.....what a headache!   And yet it was worth it. Anyway I guess my point is use it/buy it at your own risk!


Thanks for reading or looking at this post :)