Showing posts with label glitter polish. Show all posts

Saturday, 11 January 2014

Langerhans Cells Inspired Nail Art: Nail Art Ideas Link Up January Challenge: Health and Wellness

I have always wanted to participate in a nail art challenge but they have always seem so impossible to me with 2-3 different designs per week!! Jacqui at Crafty nail recently let me know about the "Nail Art Ideas Linkup" that she organises each month with Brijit from Brijit’s Digits and Jemma from Eeeek! Nail Polish!  . These challenges are very chilled with just four designs per month, and no pressure to complete them all- Perfect!!! They are also very creative ideas, a bit different from the common themes you see in nail art challenges such as blue, dots, marble, etc :)


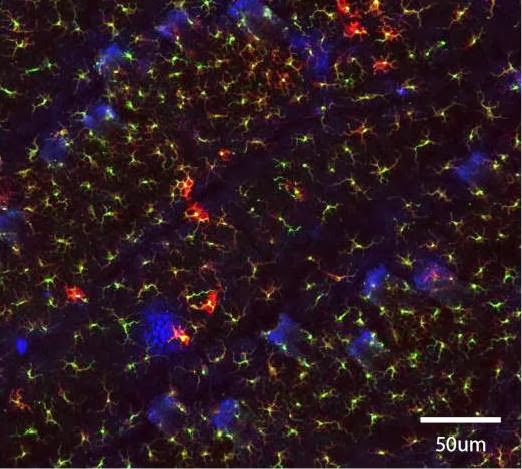
This month the first theme is health and wellness. Being a PhD student involved in medical research I immediately wanted to try some histology inspired nails. In my honours year I was lucky enough to do a lot of fluorescent immunohistochemistry which I imaged on a confocal microscope which is able to image very thin slices of an image and even build 3D images of whatever specimen your working with! The cells I studied were Langerhans cells which are dendritic cells which reside in the epidermis of the skin and have long arms that search for antigens and are the first step in triggering an adaptive immune response. Anyway...enough of that- all you need to know is that they are very beautiful! Here is some close up images (A=unactivated, B= activated). Sorry about the grainy image- its straight from my thesis!! The red and yellow cells are the Langerhans cells and the blue cells are the nuceli of the keratinocytes or skin cells :)


 And here is a less zoomed image- aren't they pretty??? (Yup I'm pretty proud of these pictures haha)


Ok and now for my attempt to recreate them on my nails :)


 I painted my nails first with OPI Black Onyx, and then with a polish I made to look like the blue 'hoescht' stained keratinocytes which has blue circular glitters and some holographic small glitters just for fun ;)

I then used white acrylic paint to paint the cells so they would stand out over the black. I made sure the cells arms weaved between the keratinocytes. I used China Glaze Sun-Kissed and China Glaze Shell-o to colour the cells.


I think I managed some likeness to the real thing but the arms needed to be finer. What do you think? Thanks for stopping by, and if you are interested in the nail art ideas link up (NAIL) follow this link.

Saturday, 28 December 2013

Indian Ocean Holiday Nails!

Hey friends! 
Sorry that I haven't posted in over a week-Christmas stress got the better of me! But don't worry, I'm all relaxed now at Rottnest island with my best friend and parents :) I have some nail art to share with you. I made a new nail polish for my friends Christmas present so we are both wearing it. It's a black polish with holographic particles and colour shifting glitters and some purple glitter. This iPhone picture is pretty awful unfortunately so I'll have to make another bottle for myself when I get home and take proper pictures. 
The feature nail is the blue polish I made recently called midnight snow... Applied over Sally Hansen pacific blue. The stamp is from the mo you sailor collection- 04 (it's one of the plates with small images). 

And here is a picture of me and the most giant crayfish I have ever seen! One of my Dads friends caught heaps of them and donated it! 

Anyway I hope everyone had a wonderful Christmas! 
I'll be home in a few days and the more regular posts will resume :) 


Wednesday, 11 December 2013

Christmas 2013 Nail Art Ideas: Simple and Not So Simple!

I must be the only nail art blogger whom has made it to half way through December without posting Christmas nail art. There is a reason for that.... I have been saving up all my Christmas manis for a big Christmas Nail Art extravaganza! 


First up I have a stamping manicure done with a Mo You London plate: Suki 07. I didn't buy any Christmas stamping plates (which I'm now regretting) but I think this design is quite Christmasy in the right colours. To centre the design on the red nails I actually made stamping decals using this tutorial and placed them in the exact centre of my nails. The red metalic polish is Revitanail "Ruby Rich", the white on my ring finger is OPI alpine snow and the white use for stamping is the white konad stamping polish.


 I really really enjoyed wearing this mani :) If you also like it please vote for me in the MoYou competition by liking and repinning this image on their board here.
I hate asking for votes, but some of the big nail art blogs have done the same and seeing as they have thousands of followers are smashing it!


 The next is the most simple Christmas nails I have to show you. Just a plain white with golden accent nail. The white polish is Essie Marshmellow which is much like OPI Funny Bunny, another favourite of mine. This is a white jelly which becomes opaque in just 2 coats (maybe 3 on some nails). I find this is a much easier polish to apply than the creme white polishes such as OPI Alpine snow and looks really clean. The gold polish is one that I created myself. It made up of small gold and larger square gold glitters and also white square glitters which are much more apparent in real life!
 

 I went further with this mani and free handed a Christmas tree on on middle finger, stripes on the ring finger and dots on the pointer finger (with hand placed gold glitter too). The star on the Christmas tree is a rhinestone purchased from ebay. 
My favorite nail is the pointer finger with the dots! 

The red polish used is Sally Hansen Lacquer Shine (red....I don't have the label) and the green is Essie Going Incognito (pointer, middle, ring). On the pinky I used a metallic green polish: Sally Hansen Emerald City from the Xtreme wear range. The red hearts are also a glitter.


 I did the same Christmas tree on this manicure as I had accidentally created recently on another triangle mix and match nail art design. I prefer the original actually- what about you?


 Next up is some simple snowflake nail art. 
Snowflakes tend to look very complicated but really all they are is a few lines (ie do a cross and then 2 more lines to create an 8 sided star. The add 1 or 2 small dashes to the lines. You can put a dot in the centre of the snowflake with your background polish to mix it up). I used acrylic paint to paint the snowflakes and the blue polish is one I made myself, which I'm calling Midnight Snow. I absolutely love it!!


Next is another nail stamping design created with MoYou London plates- this one Pro Plate 01. I stamped in red with the Sally hansen metallic red which I have no name for (sorry!!!!) and then painted the green lines in Sally Hansen Emerald city. I did this over a base coat of Essie Marshmellow. Again I did this with the stamping decal technique although after I realized that I could have probably done it straight onto the nail.I have also entered this on in the MoYou competition. To vote please like and repin the image here. Thanks!!! xx


The next is a very subtle look inspired by Christmas sweaters ...although nobody here in Australia would ever be wearing a sweater at Christmas time- its often 40 degrees Celsius at this time of the year (over 100 f) !!!
I painted my nails with a nude polish- Essie Jazz which looks absolutely awful with my skin tone apparently!!! My fingers look grey haha. The design was handpainted with a gold polish- Essie Good as Gold. The ring finger is the same gold polish made by yours truly as previously :)

 I think I like the thumb the best!


Update* And here is another Christmas nail design. See the whole post here :)


This last one is not strictly Christmas Nail art.....but I think anything in red and white adds a bit of Christmassy cheer to your nails! The full post with allll the details can be found here :)


Thanks so much for visiting. Merry Christmas!!


Sunday, 10 November 2013

Picture Polish Starry Night And Big SDP-J Stamping


I have about five different nail art designs that I haven't posted yet because I wasn't super excited for them. I've decided that I will post them between the good stuff! 

Not that I think there is anything wrong with these black and lilac nails below. In fact it's hard to go wrong with  Picture Polish's Starry Night, a suspension of holographic specks and small white glitters in a black jelly. I applied it over 1 coat of OPI Black Onyx.

I think it looks like the nights sky when viewed from somewhere far out in the wilderness, free from city lights and pollution :)


The lilac feature nail was painted with OPI- Do you Lilac it? This is such a beautiful colour and forumla- I might actually be able to stop buying pastel purple polishes now that I own it.

The stamp is from Big SDP-J. These stamping plates are available from Dashica Beauty.
I took silver glitters from color club- platinum record and placed them in the centres of the designs to  match the metallic finish of starry night.


Keep posted as tomorrow I will be posting special nails for Remembrance day (working on them now). 


Thanks for visiting :)

Saturday, 21 September 2013

My First Jelly Sammich! Filled with Delicious Glitters and Flowers

 This is just a quick little post because I have a few today- I got behind!

Quite a while ago there was a really cool jelly sandwich mani on reddit lacqueristas (link). It's been on my to try list for quite some time, but I never owned any jelly polishes... well except for OPI dating a royal, but I never realized that it was!
Anyway, I have been dabbling in making my own polish for quite some time, but untill recently I didnt have any coloured pigments (I was just making glitter top coats). I finally got around to getting some pigments and with them I was able to make this deep vampy red jelly with golden/bronze glitters. I was lazy and used a stamp to add the flowers between layers of the jelly polish. (The stamp is from konad M66)


Thanks for stopping by <3

Sunday, 8 September 2013

Water Sparbling Again. Hoorah! It Was Meant to be Turquoise Stone...


This weekend I went along to my very first Perth Polish Posse (PPP?) meet up. Seeing as it was the first time they would be meeting me I was inspired to do something a bit more special on my nails- break out of the stamping slum that I've been in for a few weeks. Not that stamping isn't awesome.... it's just so easy to get a great look that when I'm being lazy I default to it.

I chose the most complicated technique I know of! Water marbling and water spotting (which I have dubbed water sparbling: tutorial here).
I wanted to do a turquoise stone look with some gold veins running throuhg and totally didn't nail it..
But.... it looks pretty interesting anyway


I struggled a lot trying to take pictures of this one. I ended up taking a total of 103 photos.  I think the one above is the best. 
I love love love that middle finger. It reminds me of a peacock feather. Water sparbling is so unpredictable!


The polishes that I used were:
Bright Teal: OPI fly
Black: Sally Hansen Xtreme wear in Black Out
Gold: Saly Hansen Xtreme Wear in Good as Gold
The metallic teal (this didn't show up much in the photos) is Revlon Ocean Breeze.

Do other people freak out about wasting there good polishes on a water marble? I never touch my OPIs or Essies for marbling!


This one (above) is the only close up shot I got of my right hand. You can see it got a few spotted bits on the ring finger. For the water spotting, this time I used a makeup brush cleaner spray that had alcohol in it (the Priceline pharmacy brand- incidentally.... don't buy this for cleaning makeup brushes- it hardly does anything!)


 Thanks for stopping by :)


Pink, Gold and Rose Nails


This was just a quick manicure I did before I went out for dinner a few nights ago, but it ended up looking really nice. Pink and gold always seem to look great together no matter what you do :)


The dusky pink polish is OPI Dulce de Leche.
This polish seems to look pink when pared with some colours, and more of a nude when pared with others. I assume it looks very different with skin tone too.
I think it would be a lovely polish to wear if your work is conservative with nail polish. It's a nude, but not a nude :)


The stamp is from big SDP A, from Dashica Beauty.
I used Essie Good as Gold to do the stamping. 


And this glitter polish is homemade :) I think its my favorite that I've ever made so far! I got the large to small glitter ration just right! I wish I had weighed the ingredients out so I could replicate it.
 
Thanks for reading :)

Wednesday, 4 September 2013

Minty Stamping with Cheeky Viva Mexico

This manicure is the one I did when I was making the stamping tutorial.
It's a little meh...I removed it after only 1 day.

I think I am disheartened as I cut my nails too short =(
I thought it would be a good idea to cut my nails while I was wearing nail polish so I could concentrate better on the shape, and I went overboard. 
Hopefully they will grow back fast!


The green polish on my thumb, pinky, middle and index fingers is OPI 'Gargantuan Green Grape'
The White/grey on my ring finger is OPI 'My Boyfriend Scales Walls'
The ring finger is stamped with China Glaze Aquadelic
The thumb is stamped with Konad white stamping polish
The glitter is one that I made myself. It has a mixture of  matte white glitters, and then these whitish glitters that change colours (the whole rainbow!) in the light. 


The stamp is from Cheeky's 2013 jumbo collection: The Viva Mexico plate.


Thanks for reading :)

Chanfie
xx


Tuesday, 27 August 2013

Bridal Nails Special!

A Couple of Different Wedding Day Options

I recently started a wedding Pinterest board and I couldn't find many pictures of wedding nail art designs that I liked. So I decided to start trying a few different designs out myself. Gotta be prepared !

Ok first up, the most simple. This is just a milky white jelly polish (Cutex nail whitener) with a coat of seche vite top coat. This cutex polish suffered from awful shrinkage- I had to file the tips of the nails where it had shrunken back from. Better versions of this white jelly include OPI funny bunny, OPI Don't touch my tutu or Essie Marshmallow.
In 2012 OPI did a lovely collection of soft jelly shades that would be perfect for a bride. They are now available as a part of OPI's soft shades range. There are great swatches of the OPI NYC Ballet collection here by Scrangie. I recently purchased Don't Touch My Tutu, My Pointe Exactly and You Callin Me a Lyre. I also own the glitter in the collection Pirouette My Whistle which I used in a mani below if you scroll down :)


Next up I tried adding some small pearls to the base of the nails. Pearl Rhinestones for nail art can be purchased here for very cheap here on ebay

I was thinking it might even look nice to do these in the same colour as your flowers/bridemaids dresses (or do this as a feature nail only on the ring finger to be more subtle)


I cheated and copy pasted a second rhinestone on the ring finger to see how that might look.... I like it!


Next up I did some nail stamping. I kept it subtle and just did a feature nail, but I think it's delicate enough that it would be nice to have on all the nails. 

This stamp design is from the XL-C plate available on ebay here. (I have purchased XL stamp plates from this ebay seller "worldwide_buy" before and received everything fine).

I used konad special white stamping polish (available on the konad website here or on ebay here.)

If you are unsure what nail stamping is I did a big tutorial/guide/review here.  


Next I did a simple glitter look using OPI Pirouette my Whistle over the milky white base. Its a fine silver glitter with larger iridescent white glitters. As I said this polish is from the OPI NYC ballet collection..... they say ballet but I think they were targeting the wedding market!
 I covered the whole ring finger, and for the rest of the nails I just dabbed some around the base. 


This last one I did a few months later once I ordered a few bottles of polish from the OPI NYC ballet collection. This one is 'Don't touch my tutu', a white jelly. I also bought OPI funny bunny which is also a white jelly, but it is less sheer than the one bellow. Here is a link to a swatch of OPI funny bunny so you can see the difference (scroll down as I put a picture of it alone).

The silver stamping is done with Sally Hansen Xtreme wear in 'Celeb City' and the design is from the Mo You London Pro 06 plate. Again, if you are unsure how to nail stamp please see my tutorial and guide here

The camera (or me) had trouble capturing the shimmer so this photo is a little blurry unfortunately. The silver stamped with a simple and sparse floral design over the white jelly polish looked so clean and pretty. It was also quite subtle. For me, I think this may be a winner for my wedding day. I will have to try different stamps though :)


Well I hope these ideas can help someone out for their wedding day :)
I plan to keep adding to this page if I think of anything else. Please leave a comment if you have any ideas you would like me to try out or if you know of any other good bridal nail polishes  :)

Monday, 26 August 2013

More Sandwich Bag Marble and Cheeky Viva Mexico

I've been enjoying looking at all the lovely bright summery nail art that people on the other side of the world have been showing off for the last few months, and wanted to get in on the trend. 
I may have jumped the gun on the summer neons here in Perth, Western Australia... it's technically still winter, but on Saturday when I did this it was such a lovely sunny day that I couldn't resist.


At first I actually did all the nails with a marble, but I wasn't really liking it , so I redid most of the nails and kept the ring and index fingers. If you haven't been following my blog, the marble is done using a sandwich bag and I've been kind of obsessed with this technique the past weeks. I have a tutorial here on the technique. I have also used it to create a rather interesting gradient here. This time I used a glitter polish in the mix which was kind of cool, although I think it would have looked nicer with a metallic glitter rather than matte. 


Ok all the important info.....

The polishes I used were:
Bright Pink: China Glaze Heli-Yum
Bright red/coral: OPI- OPI on Collins Ave
Bright each/orange: China Glaze Peachy Keen.
The glitter polish is one I mixed up myself to match:)

The stamping plate I used was from the new 2013 Cheeky collection- The Viva Mexico plate.  
Both the images I used stamped beautifully. I stamped with the Heli-yum and OPI on Collins Ave (painted half the plate with one colour and the other half with the other polish to create the gradient effect).


Oh!!! This weekend I made an instagram account and also a tumblr page for my blog!
I got the advice from the lovely Natalia from Cats n Nails, a fellow Western Australian nail art blogger. I hope that if anyone is interested in my nail art that I will now be easier to follow :)
So far I'm loving instagram! Everyone seems very friendly, and I think I'm addicted already. 
The links should be up the top right of my blog. 

I made a new profile pic for various blog related things this week too! What do you think? I couldnt resist wearing some matching bright lipstick!


Thanks very much for reading :)
Chanfie xx