Tuesday, 30 July 2013

Pastel Paint Splatter Nail Art Tutorial

Over the weekend I felt like trying something new.
I ambitiously embarked on splatter nails an hour before I had to be at a party... 
It was an interesting look with polish all over my fingers :)

Now that I've cleaned up I'm really enjoying them. I tried to choose very subtle colours- mint and lavender on grey. I also added in silver splatters- I love silver on grey :)


The Background colour is OPI Skull and Glossbones
The mint is China Glaze re-fresh mint
The purple is China Glaze Sweet Hook
and the silver is China Glaze Devotion :)
And as promised there is a tutorial here


I really like it. Its quite subtle, but when the silver catches the light it looks amazing!


Thumb!


I tried to be creative with my finger posing :)


Before I removed this mani, I thought I'd have a play around with some other polishes. I added OPI fly and Revlon midnight affair. The OPI fly worked beautifully for splatter! It went stringier than all the other polishes I have used. 


I think it looks oceanic.....perfect for this blog! 
What do you think?
I love it so much that I think I'll be doing an ocean spray splatter in the near future!


I put together a little pictorial for anyone who was wondering how splatter nail art is done.


Some notes:
  • I forgot to add that you need to put down some newspaper or paper towels in the area you will be working. Polish goes everywhere!    
  • Also, instead of painting the inside of the straw, you can just dip it in the polish bottle (or a blob of polish on some alfoil/wax paper etc.). I thought painting the inside of the straw would be less wasteful, and it seemed to work pretty well. 
  • You can play around with different straw diameters and the distance you have the straw from the nail. I kept missing the nail completely, so did it from pretty close. 
  • I highly recommend trying different polishes (test them out on some paper before your nail). Some seem to work a lot better- maybe thicker polishes? I found that creme OPI polish works well. 
  • Also, I found that using a thinner straw gave better results (It seemed more consistent and was easier to control the amount of polish). I didn't have any particularly small diameter straws, so I made one! - like this:

You don't want to know what happens if you use the same straw too many times....


Thanks for reading :)
Chanfie
xx


Follow my blog with Bloglovin

Wednesday, 24 July 2013

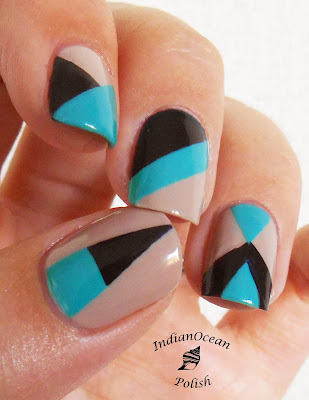
Colour Blocking Nails with OPI Fly

I've seen a couple of pictures on Pinterest of colour blocking nail art using a black/almost-black colour, a nude and a bright. I think this kind of colour combo looks great together, especially in big chunky designs and I have really wanted to try it for some time. 
 Being a turquoise addict, I decided to go with OPI 'fly' as my bright. I used OPI 'Lincoln park after dark' as my dark colour- however it probably would have been easier to just use black as the purplyness didn't show up really. For my nude I used Essie Jazz which is very close to my skin colour in real life. 

I started of using scotch tape to create the different colour 'blocks' but the polish was bleeding underneath. I switched to striping tape which seemed to solve the problem. (Striping tape can be purchased from many ebay stores for about $1.50 for 10 rolls)

I'm in love with how they look, very classy. It's almost work appropriate!

Here they are :)


Saturday, 20 July 2013

Purple and Gold 'Skittles' Nail Art

A few days ago I wasn't really sure what I wanted to do to my plain old purple nails to jazz them up a bit... and ended up trying a bunch of different things....5 in fact :)

 I think most people are calling this kind of 5 nail mix and match 'skittles nails'.
 I went with a purple and gold theme using gold glitter, striping tape and polish, and two other purple polishes (in addition to the one I was already wearing)

 The background purple is OPI Casino Royal, a favourite of mine. 

 The pinkie was done by first putting a streak of top coat down the middle of the nail and hand-placing (or more accurately tweezer-placing) square glitter down the centre of the nail. I thought it needed something else so painted the tip with a golden glitter polish (home-made).

 The ring finger was kind of a lucky fail of watercolour nails. I tried doing it with polish I had thinned with a polish thinner rather than just using an acetone soaked brush as I have done previously. So instead of being washed out it was just really watery and prone to dribbling into my cuticles....which as it turned out was a good thing!
It's hard explain without pictures...I think I’ll make a tutorial once I get bored of these nails..... Anyway I was very happy with how they turned out. I think it looks a bit like a camouflage pattern.
 The gold is Sally Hansen Xtreme wear 'Golden-I', the dark metallic purple is Revlon 'No Shrinking Violet' and the pastel purple is China Glaze 'Sweet Hook'.

 The middle finger was done by using scotch tape to tape off a triangle at the tip of the nail (starting about half way down the nail) and painting this tip with the Golden-I. I then used tweezers to carefully place gold striping tape. After the gold polish had dried completely I used more striping tape to tape of the small purple tip, and painted it with OPI Casino Royal. (And then removed that striping tape) 

 For the pointer finger I just dabbed on the gold glitter polish (more at the base of the nail, and less at the top to create a gradient) 

 For the thumb I scotch taped off the bottom half of the nail and stamped an image from Xl-D with China Glaze 'Sweet Hook'. I then removed the tape and painted a thin line with Revlon 'No Shrinking Violet', and pressed gold circular glitter into the polish. 

 The only problem with skittles nails is having to write a description of every nail!

The reason I took so long to post these, is that I was determined to make a light box on the weekend.... which I achieved today! Yay!
I made it out of a cardboard box and baking paper. I think my pictures look way better than usual!.... I'm getting there slowly. Unfortunately the awesome light I'm using is only on loan from my FiancĂ©’s Dad who is an electrician, so I need to find a replacement. It’s an LED and is worth about 100$ apparently so I'll have to find an alternative!

He said he could get me a pretty good one for an affordable price though so I'm still very happy!

So here they are: I think its my best cuticle clean up ever!


Well I hope you enjoyed reading this as much as I enjoyed creating this nail art :)


Thursday, 18 July 2013

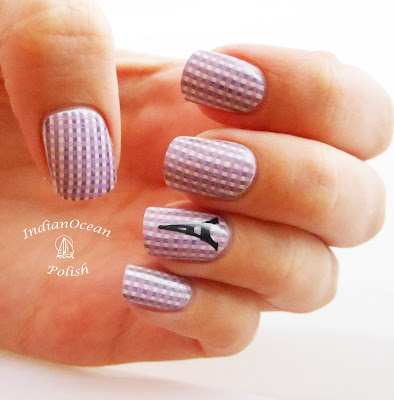
Eiffel Tower Tablecloth Patterned Nails


Just before I went away, the new Cheeky European romance plate that I had ordered about 2 months earlier arrived in the nail. Fewf! Just in time- because I was dying to use the Eiffel tower stamp.... so that I could, of course, take a picture of them with the Eiffel tower in the background. (I had planned this for months!)

Now the Eiffel tower print was particularly chunky so I decided to only use it only for a feature nail and do something fancy in the background and other nails (but not too loud as to distract from the Eiffel tower!).
I'm annoyed with myself for not realizing there was about 3 other Paris monument designs on the European Romance plate that I could have also used- but oh well-guess I’ll have to go back ;)


For some reason I thought pastel tablecloth patterned nails might be sort of French (no idea why), so I decided to use a trick I came up with about a year ago to double stamp with lines/stripes to create a tablecloth pattern of two colours (I'm not sure if there is a better name for this sort of pattern?). The lined stamp design was from XL-N. Here is a quick little diagram of what I did:


For the Eiffel tower I first tried stamping directly onto the nail and couldn't get it centered. So I then made a decal with the stamp and used that instead. If you don't know how to do this please visit my tutorial on how to make your own decal here.  

And without further adieu- The nails with bonus Eiffel tower!!!


And because the lighting was awful! Some others without the Eiffel tower.


And a bonus blurry picture with the Mona Lisa! 

Polishes used were:
 OPI my boyfriend scales walls (background grey)
Konad pastel pink
Konad purple
Konad black

For some reason my konads don't have colours written on them... So I have to make up boring names.. 

Monday, 15 July 2013

Engagement nails!!!! Pink and Red Poppies


I have a very exciting post today!!!!
I haven't been able to post anything for the last month as I have been on holiday in France. Anyway, so after about 2 weeks with plain nails I was very very keen to do some nail art! (I managed to have fancy nails on the holiday for about 2 weeks and then gave up)

Anyway from the title you may have deduced that I got engaged while I was on holidays. So of course I felt the need to do special engagement nails.   

You may wonder what poppies have to do with an engagement....
We were staying the night in a hilltop village in Provence called Bonnieux, and went for a walk to the top of the town/hill after dinner. There was nobody else around and the view of the countryside and the neighboring town Lacoste was amazing. Right over the edge of the path there was lots of poppies growing, and there was a plant that had pink poppies instead of red. I hadn't seen this before, and was taking pictures. They weren't working out very well, so I turned around to ask for my Fiancés better camera. He was down on one knee......


I’ve never been so happy in my life.


I used a tutorial for poppies I found on Paulina's Passions nail blog found here: http://paulinaspassions.com/poppy-flower-nail-art-tutorial/

The background colour is OPI "Did you hear about van gogh" - It was the first time I've used this polish. I really really love it. Ill be purchasing a backup.

The red is Konad special red

The pink poppies are a mixture of revlon Tuscan sun and Rimmel Ash Rose

And the black is Konad special black 

(I find the konad polish good for nail art as they are so pigmented)